
The information on this page should be considered as general advice only.
ACO offers this guidance in good faith and if in doubt, engineering advice should be sought.
| System | AS 3996 | Grass haunch to top | Pavers pavers to edge | Pavers haunch to top | Asphalt sloped haunch | Asphalt haunch to top | Concrete haunch to top |
||||||
|---|---|---|---|---|---|---|---|---|---|---|---|---|---|
| K50 (Gal rail) | Class A-B | - | - | - | - | ||||||||
| K50 (Gal rail) | Class C-D | - | - | - | - | ||||||||
| KS50 (S/S rail) | Class A-B | - | - | - | - | ||||||||
| KS50 (S/S rail) | Class C-D | - | - | - | - | ||||||||
| K100 (Gal rail) | Class A-B | ||||||||||||
| K100 (Gal rail) | Class C-D | ||||||||||||
| KS100 (S/S rail) | Class A-B | ||||||||||||
| KS100 (S/S rail) | Class C-D | ||||||||||||
| K200 (Gal rail) | Class A-B | ||||||||||||
| K200 (Gal rail) | Class C-D | ||||||||||||
| KS200 (S/S rail) | Class A-B | ||||||||||||
| KS200 (S/S rail) | Class C-D | ||||||||||||
| K300 (Gal rail) | Class A-B | ||||||||||||
| K300 (Gal rail) | Class C-D | ||||||||||||
| KS300 (S/S rail) | Class A-B | ||||||||||||
| KS300 (S/S rail) | Class C-D | ||||||||||||
| Brickslot | System | Nominal wheel load | Pavers pavers to edge | Concrete haunch to top |
||
|---|---|---|---|---|---|---|
| Brickslot 100 | K100 (Gal rail) | 2,670kg | ||||
| Brickslot 100 | K100 (Gal rail) | 8,000kg | ||||
| Brickslot 100 | KS100 (S/S rail) | 2,670kg | ||||
| Brickslot 100 | KS100 (S/S rail) | 8,000kg | ||||
| Brickslot 100 | H100K (Gal rail) | 2,670kg | ||||
| Brickslot 100 | H100K (Gal rail) | 8,000kg | ||||
| Brickslot 100 | H100KS (S/S rail) | 2,670kg | ||||
| Brickslot 100 | H100KS (S/S rail) | 8,000kg | ||||
| Double Brickslot 100 | K100 (Gal rail) | 2,670kg | ||||
| Double Brickslot 100 | K100 (Gal rail) | 8,000kg | ||||
| Double Brickslot 100 | KS100 (S/S rail) | 2,670kg | ||||
| Double Brickslot 100 | KS100 (S/S rail) | 8,000kg | ||||
| Double Brickslot 100 | H100K (Gal rail) | 2,670kg | ||||
| Double Brickslot 100 | H100K (Gal rail) | 8,000kg | ||||
| Double Brickslot 100 | H100KS (S/S rail) | 2,670kg | ||||
| Double Brickslot 100 | H100KS (S/S rail) | 8,000kg | ||||
| Twinslot 200 | K200 (Gal rail) | 2,670kg | ||||
| Twinslot 200 | K200 (Gal rail) | 8,000kg | ||||
| Twinslot 200 | KS200 (S/S rail) | 2,670kg | ||||
| Twinslot 200 | KS200 (S/S rail) | 8,000kg | ||||
| Twinslot 200 | H200K (Gal rail) | 2,670kg | ||||
| Twinslot 200 | H200K (Gal rail) | 8,000kg | ||||
| Twinslot 200 | H200KS (S/S rail) | 2,670kg | ||||
| Twinslot 200 | H200KS (S/S rail) | 8,000kg | ||||
| Double Brickslot 200 | K200 (Gal rail) | 2,670kg | ||||
| Double Brickslot 200 | K200 (Gal rail) | 8,000kg | ||||
| Double Brickslot 200 | KS200 (S/S rail) | 2,670kg | ||||
| Double Brickslot 200 | KS200 (S/S rail) | 8,000kg | ||||
| Double Brickslot 200 | H200K (Gal rail) | 2,670kg | ||||
| Double Brickslot 200 | H200K (Gal rail) | 8,000kg | ||||
| Double Brickslot 200 | H200KS (S/S rail) | 2,670kg | ||||
| Double Brickslot 200 | H200KS (S/S rail) | 8,000kg | ||||
| System | AS 3996 | Grass haunch to top | Pavers pavers to edge | Pavers haunch to top | Asphalt sloped haunch | Asphalt haunch to top | Concrete haunch to top |
||||||
|---|---|---|---|---|---|---|---|---|---|---|---|---|---|
| H200K Gal rail | Class A-B | ||||||||||||
| H200K Gal rail | Class C-D | ||||||||||||
| K200 (Gal rail) | Class A-B | ||||||||||||
| K200 (Gal rail) | Class C-D | ||||||||||||
| KS200 (S/S rail) | Class A-B | ||||||||||||
| KS200 (S/S rail) | Class C-D | ||||||||||||
| System | AS 3996 | Grass haunch to top | Pavers pavers to edge | Pavers haunch to top | Asphalt sloped haunch | Asphalt haunch to top | Concrete haunch to top |
||||||
|---|---|---|---|---|---|---|---|---|---|---|---|---|---|
| S100K | Class C-D | - | - | ||||||||||
| S100K | Class E-G | - | - | ||||||||||
| S200K | Class C-D | - | - | ||||||||||
| S200K | Class E-G | - | - | ||||||||||
| S300K | Class C-D | - | - | ||||||||||
| S300K | Class E-G | - | - | ||||||||||
| System | AS 3996 | Grass haunch to top | Pavers pavers to edge | Pavers haunch to top | Asphalt sloped haunch | Asphalt haunch to top | Concrete haunch to top |
||||||
|---|---|---|---|---|---|---|---|---|---|---|---|---|---|
| H100K Gal rail | Class A-B | ||||||||||||
| H100K Gal rail | Class C-D | ||||||||||||
| H200K Gal rail | Class A-B | ||||||||||||
| H200K Gal rail | Class C-D | ||||||||||||
| H300K Gal rail | Class A-B | ||||||||||||
| H300K Gal rail | Class C-D | ||||||||||||
| H100KS S/S rail | Class A-B | ||||||||||||
| H100KS S/S rail | Class C-D | ||||||||||||
| H200KS S/S rail | Class A-B | ||||||||||||
| H200KS S/S rail | Class C-D | ||||||||||||
| H300KS S/S rail | Class A-B | ||||||||||||
| H300KS S/S rail | Class C-D | ||||||||||||
| H100SK DI rail | Class C-D | ||||||||||||
| H100SK DI rail | Class E-G | ||||||||||||
| H200SK DI rail | Class C-D | ||||||||||||
| H200SK DI rail | Class E-G | ||||||||||||
| H300SK DI rail | Class C-D | ||||||||||||
| H300SK DI rail | Class E-G | ||||||||||||
| System | Nominal wheel load | Grass haunch to top | Pavers paver to edge | Pavers haunch to top | Asphalt haunch to top | Concrete haunch to top |
|||||
|---|---|---|---|---|---|---|---|---|---|---|---|
| Pit with Stainless 5 Star Heelsafe® Anti-Slip grate | 330kg | ||||||||||
| Pit with Galvanised Heelguard grate or Galvanised Transverse grate | 2670kg | ||||||||||
| Pit with Galvanised Transverse grate | 5000kg | ||||||||||
| System (AS 3996) | Pavers 1 pavers to edge | Pavers 2 haunch to top | Asphalt 1 sloped haunch | Asphalt 2 haunch to top | Concrete haunch to top |
|||||
|---|---|---|---|---|---|---|---|---|---|---|
| TD200 (Load Class D) | ||||||||||
| TD300 (Load Class D) | ||||||||||
| System (AS 3996) | Pavers 1 pavers to edge | Pavers 2 haunch to top | Asphalt 1 sloped haunch | Asphalt 2 haunch to top | Concrete haunch to top |
|||||
|---|---|---|---|---|---|---|---|---|---|---|
| QK100 (Load Class D) | - | - | - | - | ||||||
| QK200SF (Load Class D) | - | - | - | - | ||||||
| QK200SM (Load Class D) | - | - | - | - | ||||||
| QK200B (Load Class D) | - | - | - | - | ||||||
| System (AS 3996) | Pavers 1 pavers to edge | Pavers 2 haunch to top | Asphalt 1 sloped haunch | Asphalt 2 haunch to top | Concrete haunch to top |
|||||
|---|---|---|---|---|---|---|---|---|---|---|
| RD200V (Class D) | ||||||||||
| RD200V (Class G) | ||||||||||
| System (AS 3996) | Pavers 1 pavers to edge | Pavers 2 haunch to top | Asphalt 1 sloped haunch | Asphalt 2 haunch to top | Concrete haunch to top |
|||||
|---|---|---|---|---|---|---|---|---|---|---|
| Qmax 225/300/350 (Class D) | - | - | - | - | - | - | ||||
| Qmax 225/300/350 (Class G) | - | - | - | - | - | - | ||||
| Qmax 365/465/600 (Class D) | - | - | - | - | - | - | ||||
| Qmax 365/465/600 (Class G) | - | - | - | - | - | |||||
- Prepare a trench 200mm wide by 200mm deep. Fix a line along the trench at required finished height. Lay a bed of good quality concrete in the trench.
- Knock out the preformed outlet in the base of the channel or sump unit or fit a spigot stop end.
- Position outlet channel or sump unit in the concrete bed and ensure it is level. Connect to the drain or soakaway.
- Lay the remaining channels starting at the water outlet point. Hold each channel horizontally when lowering into the interlocking joint. Fit end caps.
- Position grates and surround channels with concrete haunching. Paving bricks should be laid in a bed of mortar.
- Ensure the finished paving is 2-3 mm higher than the grates to assist drainage into the channel.
If required, ACO strongly recommends wet cutting, wet drilling and/or wet grinding of polymer concrete products in a well ventilated area with the use of personal protective equipment (including masks).[/vc_column_text][/vc_tta_section][vc_tta_section title=”HomeDrain® Pits” tab_id=”homedrain”][vc_column_text css=”.vc_custom_1731558155136{padding-right: 10px !important;padding-left: 10px !important;background-color: #ffffff !important;}”]
Plastic Sumps
- Excavate a hole to the required depth
- Cut sump with sharp knife or hacksaw to fit drainage pipe
- Position sump on sand bed or mortar.
- Connect the drain pipework to sump
- Backfill and make good surrounding area.
‘Polycrete’ Sumps
-
- Excavate a hole to the required depth.
- For pipe entry or exit, cut a hole of the required diameter in the plastic insert
- Lay the sump on sand bed or concrete if sump will be exposed to vehicular traffic
- Connect drainage pipework to sump and seal joint.
- Backfill and make good surrounding area.If required, ACO strongly recommends wet cutting, wet drilling and/or wet grinding of polymer concrete products in a well ventilated area with the use of personal protective equipment (including masks).
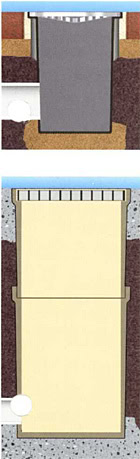
2. Rough in 75 mm or 100 mm outlet pipe, compact excavation base and lay 100 mm deep concrete bed.
3. Knockout channel base for outlet.[/vc_column_text][vc_single_image image=”27290″ css=”.vc_custom_1731558476951{padding-right: 10px !important;padding-left: 10px !important;background-color: #ffffff !important;}”][vc_column_text css=”.vc_custom_1731558487822{padding-right: 10px !important;padding-bottom: 10px !important;padding-left: 10px !important;background-color: #ffffff !important;}”]4. Lay channels working away from outlet, channels slide-fit together.
5. Pour 100 mm concrete around channel sides allowing for pavement detail.
6. Finish pavement, pavers must be 3 mm higher than the grate.
For pedestrian only applications, trench drain can be set directly on well compacted soil. For driveway applications, trench drain MUST be surrounded 100 mm of concrete.[/vc_column_text][/vc_tta_section][vc_tta_section title=”DrainLine 100″ tab_id=”drainline”][vc_single_image image=”27287″ css=”.vc_custom_1731558279320{padding-right: 10px !important;padding-left: 10px !important;background-color: #ffffff !important;}”][vc_column_text css=”.vc_custom_1731558287975{padding-right: 10px !important;padding-bottom: 10px !important;padding-left: 10px !important;background-color: #ffffff !important;}”]1. Excavate area to accommodate trench drain and 100 mm concrete surround.
2. Pour concrete bed 300 mm wide by 100 mm deep; keep outlet pipe clean.
3. Lay channels starting at outlet. Set a string line at required height to ensure level. Seal joints if required.[/vc_column_text][vc_single_image image=”27288″ css=”.vc_custom_1731558352838{padding-right: 10px !important;padding-left: 10px !important;background-color: #ffffff !important;}”][vc_column_text css=”.vc_custom_1731558306214{padding-right: 10px !important;padding-bottom: 10px !important;padding-left: 10px !important;background-color: #ffffff !important;}”]4. Fit end caps and insert grates. To keep concrete from getting onto grates or seam, protect grates with plastic.
5. Install pavers or finish pavement surround to required level, 3 mm above grate.
6. Clean away debris, remove protective plastic.
For driveway applications, trench drain must be surrounded by 100 mm of concrete.
If required, ACO strongly recommends wet cutting, wet drilling and/or wet grinding of polymer concrete products in a well ventilated area with the use of personal protective equipment (including masks).[/vc_column_text][/vc_tta_section][/vc_tta_accordion][vc_column_text css=”.vc_custom_1625014296051{margin-top: 25px !important;margin-bottom: 15px !important;}”]Site specific topics
[/vc_column_text][vc_tta_accordion shape=”square” gap=”10″ active_section=”100″ collapsible_all=”true”][vc_tta_section title=”Site installation manual” tab_id=”install-manual”][vc_column_text]To download our Site Installation Manual, please click on the link below
 | |  |
| For 100mm wide channels Part Number - 97477 | For 200mm wide channels Part Number - 97478 | For 300mm wide channels Part Number - 97479 |
ACO strongly recommends wet cutting, wet drilling and/or wet grinding of polymer concrete products in a well ventilated area with the use of personal protective equipment (including masks).
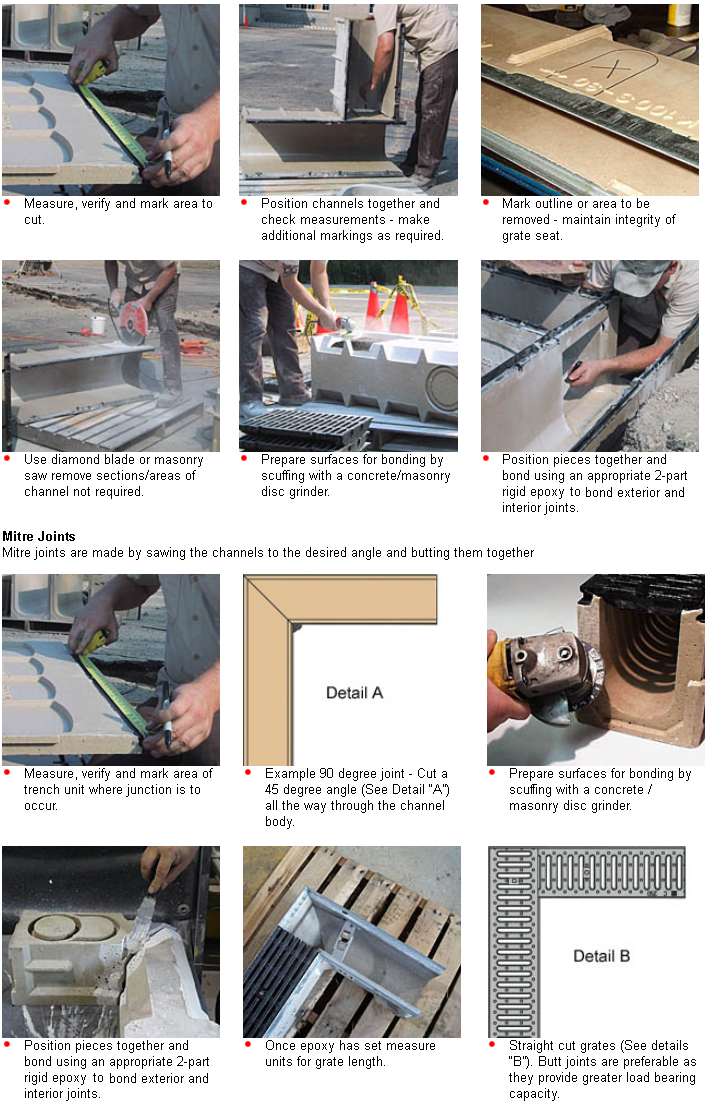
T junctions
T junctions are when an opening is cut into the side of one channel and another channel is butted up to this opening.
 [/vc_column_text][/vc_tta_section][vc_tta_section title=”Lockable ‘boltless’ grates” tab_id=”lockable”][vc_column_text]
 DrainLok – barless and boltless locking system
Compatible with KlassikDrain & SlabDrain Grates.
Fast locking device removes the need for bars and bolts and improves the channels hydraulic capacity. The DrainLok mechanism simply clips into the channel edge rail for quick installation.
ACO’s DrainLok grates are fitted with anti–shunt lugs that restrict grate movement when installed, improving durability and longevity of the system.[/vc_column_text][vcex_image width=”100%” img_size=”full” overlay_style=”” image_id=”13141″ css=”.vc_custom_1625015528938{margin-top: 20px !important;margin-bottom: 20px !important;border-bottom-width: 1px !important;padding-bottom: 20px !important;border-bottom-color: #b2b2b2 !important;}”][vcex_divider color=”#c1c1c1″ height=”1″ margin=”top:0|bottom:20″][vc_column_text] QuickLok – boltless locking system
Compatible with KlassikDrain & SlabDrain Grates.
Comprises a spigot fitted onto the grate and a removable QuickLok bar in the channel, the QuickLok system locks the grate to the channel by aligning the spigot over the bar and applying pressure until they ‘snap’ together.
With no loose bolts or bars, QuickLok provides a secure boltless lock that is still easy to remove for maintenance and cleaning. This saves time and money during installation.[/vc_column_text][vcex_image width=”100%” overlay_style=”” image_id=”13143″ css=”.vc_custom_1625015637210{margin-bottom: 20px !important;border-bottom-width: 1px !important;padding-bottom: 20px !important;border-bottom-color: #e2e2e2 !important;}”][vcex_divider color=”#c1c1c1″ height=”1″ margin=”top:0|bottom:20″][vc_column_text] PowerLok – barless and boltless locking system
Compatible with PowerDrain & SlabDrain Grates.
Fast locking device removes the need for bars and bolts and improves the channels hydraulic capacity. The PowerLok mechanism simply clips into the channel edge rail for quick installation.
ACO’s ductile iron edge rails have anti–shunt lugs that restrict grate movement improving durability and longevity of the system.[/vc_column_text][vcex_image width=”100%” overlay_style=”” image_id=”13145″][/vc_tta_section][vc_tta_section title=”How to Video: Channel Setup Using Installation Devices” tab_id=”video1″][vc_column_text][/vc_column_text][/vc_tta_section][vc_tta_section title=”How to Video: How to Install In Line Pit Extension Riser” tab_id=”video2″][vc_column_text][/vc_column_text][/vc_tta_section][vc_tta_section title=”How to Video: How to Fit PVC Pipe to In Line Pit” tab_id=”video3″][vc_column_text][/vc_column_text][/vc_tta_section][vc_tta_section title=”Polycrete® Channels” tab_id=”polycrete-channels”][vc_column_text]
[/vc_column_text][/vc_tta_section][/vc_tta_accordion][vcex_button url=”https://www.acodrain.com.au/product-support/project-support/” font_padding=”top:10|right:10|bottom:10|left:10″ font_size=”15″ css_wrap=”.vc_custom_1716945619346{padding-top: 15px !important;padding-bottom: 15px !important;}” title=”Free consultation” margin=”top:10″]Free consultation[/vcex_button][vcex_button url=”/contact-us/” font_padding=”top:10|right:10|bottom:10|left:10″ font_size=”15″ css_wrap=”.vc_custom_1716945689586{padding-top: 15px !important;padding-bottom: 15px !important;}” title=”Enquire now” margin=”top:-“]Enquire now[/vcex_button][/vc_column][vc_column width=”1/6″][vcex_image overlay_style=”” image_id=”8337″][/vc_column][/vc_row][vc_row][vc_column][/vc_column][/vc_row]